Wednesday 25 April 2018

Conclusion

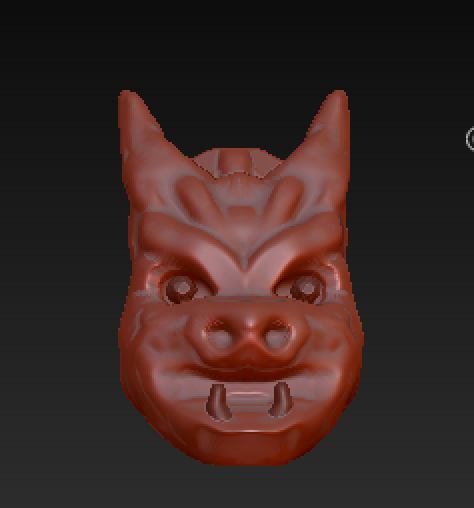
When modelling with spheres for the gargoyle. I found it difficult to find the shape; as the gargoyle is different from the way a human in made; it took time to find the right position of where the head sits in comparison to the body, especially as it looks different when viewing it as a poly mesh.  After a bit of playing around and comparing it to the reference images; I was happy with the form. I initially forgot the add more details such as the long ears and the skeleton for the wings in the z spheres, but went back and re-modelled more detail into the z-spheres before making it a poly-mesh and started to sculpt. I found the sculpting quite difficult for the face; I did this my masking out the rest of the body, working on only the face. I found it similar to drawing, marking out where the main facial elements such as the eyes, nose and mouth sat on the face, then started to subtract to make the eye sockets, and mouth. When I got the proportions sorted, I made the eyeballs and the teeth in a separate sub-tool, being different surfaces and surface finish. I used the trim adaptive and dynamic to make the gargoyles face more stone looking, this was hard as there were many edges in the face. 

Once the face was done, I could unmask it and work on the rest of the body; this was a lot easier as the general space was already made through z-spheres are it was only a matter of using trim dynamic to give the impression of a stone body. During the whole modelling process, making sure symmetry was on, so that both sides of the gargoyle were the same. 

The next part was the wings, I had modelled the main spine of the wings but forgot to model the smaller bones that ran down from the wings. I fixed this by modelling the z-spheres as a sub tool, and then once made into a poly-mesh, merging it with the original model so that the wings were a bit more detailed. Making the skin for the wings, I got the tutorial from youtube, but was fairly easy; making a plane on a sub-tool and then using the move tool to drape it over the wings; from which then I could lasso out the edges to make the curved surface between. When it came to detailing the wings, I found quite difficult as any texture I wanted to add to it, then made an impression on the other side, and when I smoothed it out, it would ruin the detail I had originally put in. So instead I detailed the wing bones. I also found it hard to smooth off the edges of the wings and where they meet the bones. Once one wing was done, I mirrored it using the deformation tool and merged it with the wing structure. 


I started on the hard surface modelling of the top of a Corinthian capital; I wanted to challenge myself, as the modelling would link to my architecture degree. This started with a plane and then turning poly-frame on; I was able to use z-modeller to make the form of the abacus; this is the flat part on the top. I started with a square; as the capital has two lines of symmetry, I turned this on in preferences; and was able to make the form; and then dividing the surface to get a nice smooth edge. Once I had one of the abacus’ modelled I duplicated the sub-tool and scaled the same form to make a more complex looking form. I took precedence from the internet and had it in the background as a reference image to make sure the proportions were right. 

Modelling the shaft of the column was easy; it was the next step of the detailing that I found difficult. Modelling the decoration on the capital was hard; first was the spiral shapes that sat in the corner, using the sphere and the cube, I merged them together and then flattened the edges, then reconfigured the mesh so that it was modelled as one; which I made the mistake of not doing in the beginning and was wondering why the two shapes still acted as though they were separate when I sculpted on top.  Once the general shape of the curve was there; it was using the dam standard tool to make the grooves in the stone and using flatten to make it look like stone. The sub tool can be duplicated and rescaled to makes more of the decoration around it.  The leaves for the column was hard, once I had one I could mirror the rest. At first I got a flat plane and tried using z modeller to try and model the leaf but was really difficult, so instead like I did with the wings for the gargoyle, I used a flat plane to lasso out a shape and then used the move tool to create the bend in the leaf, but even with the lasso it was really difficult getting a symmetrical smooth shape.  Instead, I laid out duplicates of a circle plane to get the nice curves in the leave, merged them to get the general shape of the leaf.  Decorating the leaf with its spine and the curvature was easier; using the dam standard and the flatten tool was useful in getting the grooves and making sharp edges. When a quarter of the column was modelled, the decoration could then be merged and mirrored using the deformation tool another three times around. 


Saving the project every time a significant change was made is pretty important; I learned this the hard way; sometimes something would go wrong or I would press the wrong button and it ruined the model, but luckily because I had done previous saves it was easy to discard the latest model and work from the save before. 


I really enjoyed the course; it was difficult to get used to the tools at first, and as there are so many ways to model the same things; learning what was easier was interesting; especially knowing rhino, and being able to model the hard surface much quicker, z-brush felt a bit slow. Danny was great in teaching the course, making sure everyone in the course was on the same point, even though we had a few delays in the sessions, I managed to get the sculpt done to a satisfactory level, and am quite proud, having never sculpted in z brush before. 

CONCEPT PAGES


COLUMN PROCESS


GARGOYLE PROCESS


Thursday 19 April 2018

Z BRUSH Week 10


WEEK 10 
PROJECT DEVELOPMENT WITH GUIDANCE


During easter I worked on getting all my concept pages ready for the final model; deciding which shapes and forms to make. I then began working on the gargoyle; which I found quite difficult but finished and was able to work on my capital as a plinth for my gargoyle to sit on. I carried on from where I left off on the capital in week 9; the next part was the hardest as it was the decorative greek leaves that surround the column; again, once I had one leave I could copy and scale the same leaf and then using the mirror tool in deformation; mirror the same set of leaves four times around. 


Z BRUSH Week 9

WEEK 9
PROJECT DEVELOPMENT WITH GUIDANCE


This week was spent using z-modeller to made the corinthian capital for my final model. It was difficult to manipulate into the shape I wanted, but because it has two axis of symmetry; I only have to model one face and the rest is repeated. Making the top of the column was the most difficult; once one part of the top is done; the rest could be copied and scaled to make the detail. 

Z BRUSH Week 8

WEEK 8
PEER REVIEW SESSION


Missed because of a final pin-up. However, I looked at the tutorial on canvas and tried using all the tools used before to make part of the facade. I looked back at the methods used in week 5 for guidance and found it easier to use; in order to make part of the facade. I began modelling the facade the week before, but only got as far as modelling simple components. I finished the facade of the hotel and added the textures in the background which was pretty simple. 

Z BRUSH Week 7

WEEK 7
OUTPUTS AND PROJECT PROPOSALS

We went through images and how to compose the final image into telling a story. This is done through props in the scene; colour and lighting. 

Very similar to how a render is set up in architecture. We also finished off the previous weeks lessons; looking at how to use radial symmetry in z modeller and how to make rivets in the column. Also carried on trying to get used to z-modeller by starting to do the task set out, modelling part of the column of the hotel, this was also helpful in practicing for the capital of my column, making many sublayers and being able to merge the layers once I am sure of the form. 

Z BRUSH Week 6

WEEK 6

SNOW WEEK

Z BRUSH Week 5

WEEK 5
PRACTICE EXERCISE


Z-modeller was quite hard as I am used to other 3D modelling software such as Rhino which is a lot more fluid and quicker. However towards the end I got used to how to use the different tools on the surface compared to an edge; making sure I had symmetry on to make a proper shape. Learning how to change the shape in poly-frame mode; to make sure the form doesn't divide and smooth out was good to know; but even more difficult to manipulate into the exact shape I wanted.  

Knowing what the commands were in order to manipulate lines and planes. I also learnt how to use sub-tools that created layers of different part of the material that could exist in the same model together without disrupting another components modelling, and being able to turn the visibility on and off is useful. 


Knowing that I am going to do a gargoyle for my final project; I began making concept sheets of the gargoyle and the capital on which it will sit and what kind of materials each of the forms will look like. I will use the z-modeller to make the capital of my column for the final project; I think this will be difficult as there are quite a few curved forms in the corinthian capital. I wanted to make it a challenge for myself as I know how to model a corinthian capital in Rhino and draw a 2D version; and want to try making it in z-brush. I think this will be the hardest part. 

Z BRUSH Week 4


WEEK 4
REFINING A MODEL


The lesson was learning how to make a rock. I really enjoyed learning how to use some of the other brushes that helped with hard surface modelling. Using the trim adaptive and dynamic was really fun; as it makes the hard surface look weathered and more natural.; and to then easily turn it into a metal surface by polishing the edges to make it look smooth. The polish brush will be helpful if I decide to make armour for the sculpture. The noise scale was a quick way of adding texture to make the rock look more natural and will be useful when creating my gargoyle; to give it a weathered look. 

I have also been thinking about the final project over the past few weeks and come across gargoyles and that are animal like sculptures that are integrated into gothic buildings. 

Z BRUSH Week 3


WEEK 3
PLANNING A PROJECT 2

This week we were a little behind; and finished off week 2 with masks and alphas. This was really useful; rather than having to draw the same shape and spending time making it all look symmetrical; alphas can be used similar to a stamp; in both addition and subtracting. Especially when there in intricate detailing that would take a long time to model; the alpha would be useful.  We practiced with engravings on a rock; and if I am going to do a historic piece of architecture, any plaques or engravings can be done using this. 

Masking was also very useful; leaning how to save time by modelling certain parts without worrying about modelling over others.  I also watched more tutorials on youtube; where masks can be switched onto sublayers. 

Z BRUSH Week 2


WEEK 2
PLANNING A PROJECT

This week was interesting; I got to start thinking about the final project and how to lay out boards that projected the way I wanted to convey the story in the sculpture. Like architecture; it is the materials, colour, texture and the shapes that are important; and very similar to the way architectural construction drawings are set out; the concept must have a true front; back, side and top in order to start sculpting as a reference. This made me start thinking about what I was going to sculpt for my final project; as I needed two different types of modelling; one for hard surfaces and one that is organic. Having never used z brush properly; I wanted to pick something that I could learn the geometry of architecture form. Danny showed us some of the old renaissance facades with sculptures engraved into the facade. 


Using Z Spheres at first I found quite difficult; but once I understood what each tool under ‘Edit’ did; I found it easier to manipulate. Knowing it was important to turn on symmetry when doing the sculpt. Here it is good to reference the human body skeleton as a reference to create joints in the form.    The Z spheres are will be useful for my organic form; so getting to know how to use them and manipulate the spheres to get the exact form I want will be helpful; as once it is made into a poly-mesh I can’t go back to remodel it. 

Z BRUSH Week 1

WEEK 1
INTRODUCTION TO ZBRUSH INTERFACE

I missed this week due to an architecture course meeting that clashed with the first session. However I have played around with z brush previously and felt that it would be easy to try and recap using the detailed documents on canvas. 
Before the next session; I familiarised myself with the interface of z brush; getting to know how to move around the canvas. I followed the steps of dragging out a 3D sphere; and learning to edit it; through the draw, move and scale features. What I learnt through this first session; was that it was important to use the PolyMesh3D button in order to make the sphere editable. From this point; it was learning what the basic brush tools could do; how to use them in addition and in subtraction; similar to if you were sculpting in reality.  Also finding out how all the different brushes worked was fun to play around.